
How-to: Setting up the plugin for usage, including a forward and reverse DNS resolution test case
Overview
Two steps are needed to configure the plugin to work:
- Define resource which defines access to the plugin.
- Add the DNS resolution test case to the Pineapple module.
A prefabricated example in the default configuration
Pineapple includes a prefabricated version of this example in the default configuration. The example is named infrastructure-test-003-dns-resolution-localhost. The default configuration is created by starting Pineapple. The default configuration will also create the required resource in the local environment which is described below.
So, you can either follow the instructions below and create the example manually or just go to the example module and inspect how it is configured.
Download and install Pineapple
- Download and install the Pineapple stand-alone web application.
- Start Pineapple by invoking runPineapple.cmd in the installation directory. This will create a default configuration in ${pineapple.home.dir} which by default is resolved to ${user.home}/.pineapple
- Kill Pineapple.
Define resource
For information about how to define a resource for the plugin, refer to the general usage page.
To define the resource, first open the resources file at ${pineapple.home.dir}/conf/resources.xml and add an environment that the test case should belong to. In this example we intend to add the test case to a environment named local.
The resulting environment definition must look like:
<?xml version="1.0" encoding="UTF-8"?>
<configuration xmlns="http://pineapple.dev.java.net/ns/environment_1_0"
  xmlns:xsi="http://www.w3.org/2001/XMLSchema-instance">

  <environments>
    <environment id="local" />
  </environments>
</configuration>
Then the resource is defined which enables usage of the plugin in the local environment:
<?xml version="1.0" encoding="UTF-8"?>
<configuration xmlns="http://pineapple.dev.java.net/ns/environment_1_0"
  xmlns:xsi="http://www.w3.org/2001/XMLSchema-instance">

  <environments>
    <environment id="local" >
      <resources>
        <resource id="infrastructure-test"
                  plugin-id="com.alpha.pineapple.plugin.net" />
      </resources>
    </environment>
  </environments>
</configuration>
What the resource attributes defines
The id defines a key which is used to reference the resource from any module we may define in the future. Later on when the test case is defined in a module. The infrastructure-test id is used to tell Pineapple that this resource (and thus the infrastructure test plugin) should be used to parse and execute the test cases which are defined.
The plugin-id is the technical part for the definition which binds the resource to some plugin code. Each plugin is identified with a Java package and the Java package for the infrastructure plugin is com.alpha.pineapple.plugin.net.
Create Pineapple module for test cases
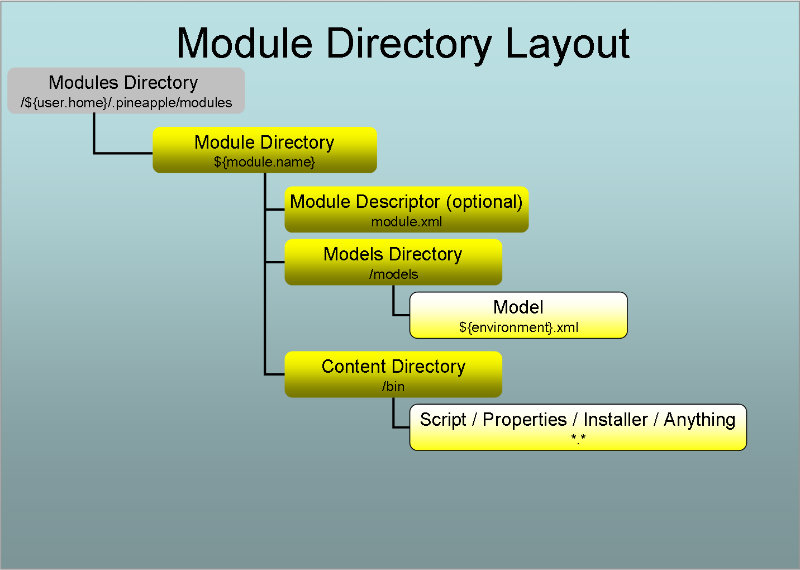
Create a new module directory
Create the module directory ${pineapple.home.dir}\modules\pineapple-dns-example.
The directory ${pineapple.home.dir}\modules is the default location for modules. The directory pineapple-dns-example is the module directory.
Create a module.xml (optional)
Please notice: This step is optional and can be skipped.
Create a module.xml file in the pineapple-dns-example directory with the content:
<?xml version="1.0" encoding="UTF-8"?>
<module xmlns="http://pineapple.dev.java.net/ns/module_1_0"
  xmlns:xsi="http://www.w3.org/2001/XMLSchema-instance"
  xsi:schemaLocation="http://pineapple.dev.java.net/ns/module_1_0
                      http://pineapple.dev.java.net/ns/module_1_0.xsd"

  id="Resolve IP test case example "
  version="1.0.0" />
What the module attributes defines
The id defines a description which is used by Pineapple at run time in clients and reports to show which module is executing and the result of the execution.
The version defines a version for the module which is by Pineapple at run time in clients and reports to show which module is executing and the result of the execution.
Create a model file
When used with the infrastructure test plugin, each model contains test cases for a different environment.
Create a model file named local.xml in the pineapple-dns-example\models directory with a basic model file for the local environment:
<?xml version="1.0" encoding="UTF-8"?>
<mmd:models xmlns:xs="http://www.w3.org/2001/XMLSchema-instance"
  xmlns:mmd="http://pineapple.dev.java.net/ns/module_model_1_0"
  xmlns:itp="http://pineapple.dev.java.net/ns/plugin/infrastructure_1_0" />
Add a new model with a target-resource attribute. The value of the target-resource should match the id of the resource which was defined previously, e.g. infrastructure-test:
<?xml version="1.0" encoding="UTF-8"?>
<mmd:models xmlns:xs="http://www.w3.org/2001/XMLSchema-instance"
  xmlns:mmd="http://pineapple.dev.java.net/ns/module_model_1_0"
  xmlns:itp="http://pineapple.dev.java.net/ns/plugin/infrastructure_1_0" >

  <mmd:model target-resource="infrastructure-test">
    <mmd:content />
  </mmd:model>
</mmd:models>
Add content to the model which uses the infrastructure test plugin through the infrastructure-test reference:
<?xml version="1.0" encoding="UTF-8"?>
<mmd:models xmlns:xs="http://www.w3.org/2001/XMLSchema-instance"
  xmlns:mmd="http://pineapple.dev.java.net/ns/module_model_1_0"
  xmlns:itp="http://pineapple.dev.java.net/ns/plugin/infrastructure_1_0" >

  <mmd:model target-resource="infrastructure-test">
    <mmd:content>
      <itp:infrastructure>
      </itp:infrastructure>
    </mmd:content>
  </mmd:model>
</mmd:models>
Add forward and reverse DNS resolution test
Add a new dns-resolution-test to the pineapple-dns-example\models\local.xml file:
<?xml version="1.0" encoding="UTF-8"?>
<mmd:models xmlns:xs="http://www.w3.org/2001/XMLSchema-instance"
  xmlns:mmd="http://pineapple.dev.java.net/ns/module_model_1_0"
  xmlns:ifp="http://pineapple.dev.java.net/ns/plugin/infrastructure_1_0" >
  <mmd:model target-resource="infrastructure-test">
    <mmd:content>
      <itp:infrastructure>

        <itp:dns-resolution-test host="localhost" ip="127.0.0.1" description="localhost resolves to 127.0.0.1 and reverse" />

      </itp:infrastructure>
    </mmd:content>
  </mmd:model>
</mmd:models>
The semantics of the elements in the test case
- The dns-resolution-test element defines the skeleton of the test case.
- The description attribute should contain a suitable description of the test which is used by Pineapple at run time in clients and reports to show the outcome of the test.
- The host attribute defines the host name which should be resolved to an IP address and resolved in reverse from the IP address.
- The ip attribute defines the IP address which should be resolved from a host name and resolved back to the host name.