
How-to: Install latest Docker version in a Vagrant box with CentOS 6.5 using SSH
Overview
This example illustrates how the SSH plugin can be used to install the latest Docker version on CentOS 6.5. The example installs Docker and starts the daemon.
Two steps are required to install Docker:
- Create a VM which serves as host for Docker. Vagrant is used for this purpose.
- Start Pineapple and execute the module.
- (When the installation is completed, pull an image.)
Part of the default configuration
This example named ssh-011-install-docker-latest-version, including all configuration files, is included in the default configuration which is created by Pineapple, so there is no need to create it by hand.
The steps
Build a Vagrant box
- Install VirtualBox and Vagrant.
- Create a Vagrant project directory docker-overpowered-prototype.
- Copy the example Vagrant configuration file from ${user.home}/.pineapple/modules/ssh-011-install-docker-latest-version/vagrant/Vagrantfile directory to the Vagrant project directory:
# -*- mode: ruby -*- # vi: set ft=ruby : BOX_NAME = ENV.fetch("BOX_NAME", "bento/centos-7.6") BOX_IP = ENV.fetch("BOX_IP", "192.168.34.10") BOX_MEM = ENV.fetch("BOX_MEM", "2048") BOX_CPUS = ENV.fetch("BOX_CPUS", "2") VAGRANTFILE_API_VERSION = "2" Vagrant.configure(VAGRANTFILE_API_VERSION) do |config| # virtual box provider specific settings config.vm.provider :virtualbox do |vb| vb.customize ["modifyvm", :id, "--ioapic", "on"] vb.customize ["modifyvm", :id, "--memory", BOX_MEM] vb.customize ["modifyvm", :id, "--cpus", BOX_CPUS] end config.vm.define :pineapple_ci do |ci_config| ci_config.vm.box = BOX_NAME ci_config.vm.network "private_network", ip: BOX_IP end end - Open a prompt, CD into the Vagrant project directory and create the box with the command: vagrant up. It will download a CentOS 6.5 image and start the VM with the IP address 192.168.34.10.
Invoke Pineapple to install Docker
Start your Pineapple client of choice:
- Select the module named ssh-011-install-docker-latest-version
- Select the linux-vagrant model.
- Invoke the deploy-configuration operation to install Docker.
Create image
With Docker installed it can be used to create containers:
- SSH into the Vagrant box using 192.168.34.10:22 with the default Vagrant credentials: vagrant/vagrant
- Validate Docker installation: sudo docker info (....which should execute with no errors).
- Change to the custom docker user: sudo su docker
- Create a Ubuntu image: docker pull ubuntu
The details
The details of the module, model and the Pineapple resources are described in the following sections.
The resources
A resource defines a entity in a IT environment which is manageable by Pineapple through some protocol. In this example, the entity is a Linux OS and the used protocol is SSH. One resource is defined for each Linux host where the YUM packages should be installed.
In this example we will use the linux-vagrant environment defined as part of the default configuration. The environment defines a network with three hosts:
- Node1 with IP Address: 192.168.34.10
- Node2 with IP Address: 192.168.34.11
- Node3 with IP Address: 192.168.34.12
To enable SSH usage for these hosts, three resources are defined within the linux-vagrant environment in the resources file located at ${user.home}/.pineapple/conf/resources.xml:
<?xml version="1.0" encoding="UTF-8"?>
<configuration xmlns="http://pineapple.dev.java.net/ns/environment_1_0"
    xmlns:xsi="http://www.w3.org/2001/XMLSchema-instance"
    xsi:schemaLocation="http://pineapple.dev.java.net/ns/environment_1_0
    http://pineapple.dev.java.net/ns/environment_1_0.xsd">

    <environments>
        <environment description="Vagrant multi-machine Linux environment" id="linux-vagrant">
            <resources>
                <resource plugin-id="com.alpha.pineapple.plugin.ssh" credential-id-ref="ssh-node1" id="ssh-node1" >
                    <property value="192.168.34.10" key="host"/>
                    <property value="22" key="port"/>
                    <property value="1000" key="timeout"/>
                </resource>
                <resource plugin-id="com.alpha.pineapple.plugin.ssh" credential-id-ref="ssh-node2" id="ssh-node2" >
                    <property value="192.168.34.11" key="host"/>
                    <property value="22" key="port"/>
                    <property value="1000" key="timeout"/>
                </resource>
                <resource plugin-id="com.alpha.pineapple.plugin.ssh" credential-id-ref="ssh-node3" id="ssh-node3" >
                    <property value="192.168.34.12" key="host"/>
                    <property value="22" key="port"/>
                    <property value="1000" key="timeout"/>
                </resource>
            </resources>
        </environment>
    </environments>
</configuration>
Each resource is defined with a different ID and IP address. All other properties are identical. The role of the attribute plugin-id is to bind the resource definition to the plugin code at runtime which implements the SSH plugin.
Please notice: Only the VM for ssh-node1 is created by Vagrant. Even though the linux-vagrant environment defines three resource, only the ssh-node1 resource is used in the example.
The credentials
Since SSH requires authentication, each resource defines a reference to a credential. A credential defines the user name and password used for authentication when a SSH session is created to a host.
Three credentials are created within the linux-vagrant environment to support authentication. The credentials are defined in the credentials file located at ${user.home}/.pineapple/conf/credentials.xml:
<?xml version="1.0" encoding="UTF-8" standalone="yes"?>
<configuration xmlns="http://pineapple.dev.java.net/ns/environment_1_0">
    <environments>
        <environment description="Vagrant multi-machine Linux environment" id="linux-vagrant">
            <credentials>
                <credential password="vagrant" user="vagrant" id="ssh-node1"/>
                <credential password="vagrant" user="vagrant" id="ssh-node2"/>
                <credential password="vagrant" user="vagrant" id="ssh-node3"/>
            </credentials>
        </environment>
    </environments>
</configuration>
Please notice: Only the VM for ssh-node1 is created by Vagrant. Even though the linux-vagrant environment defines three credentials, only the ssh-node1 credential is used in the example.
The module
A module defines input to Pineapple and consists in its minimal form of a single XML file containing a model:
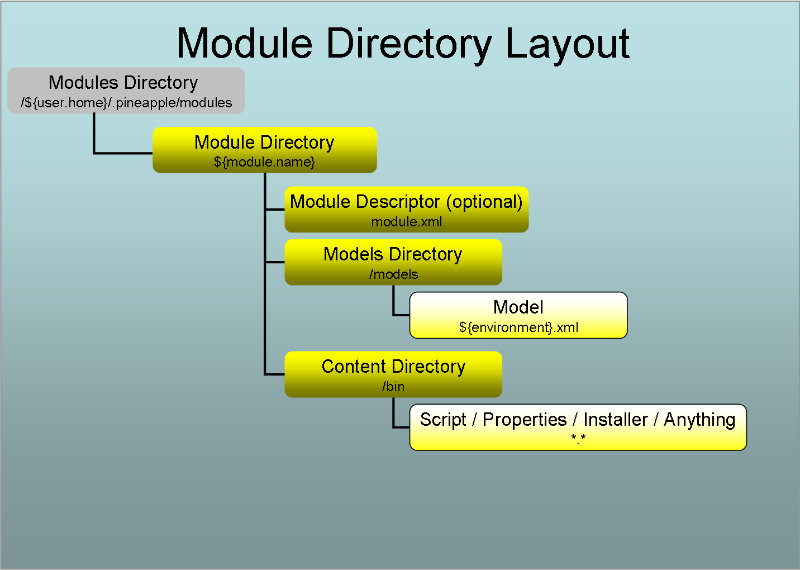
The directory: ${user.home}/.pineapple/modules/ssh-011-install-docker-latest-version contains the module. The module in this example have the structure:
ssh-011-install-docker-latest-version
 |
 +--- bin
 |     +--- create-docker.sh
 |     +--- docker.config
 +--- models
 |     +--- linux-vagrant.xml
 +--- vagrant
 |     +--- Vagrantfile
Module files
The module consists of the these files:
- linux-vagrant.xml is the Pineapple model file for the environment linux-vagrant which installs Docker.
- Vagrantfile is a Vagrant file which can build the VM where Docker is installed.
- create-docker-user.sh is a shell script to create a user named docker which is added to the sudoers to enable usage of Docker from the command line without the sudo prefix. Change to the docker user with: sudo su docker.
- docker.config is a Docker configuration file which is installed in /etc/sysconfig/docker in the Vagrant box. The file configures Docker to:
- Listen for local connections by the root user.
- Listen on 0.0.0.0:8082 to support remote usage of the REST API.
The file contains:
other_args="-H unix:///var/run/docker.sock -H tcp://0.0.0.0:8082"
The model file
The model file named linux-vagrant.xml has the content:
<?xml version="1.0" encoding="UTF-8" standalone="yes"?>
<mmd:models xmlns:mmd="http://pineapple.dev.java.net/ns/module_model_1_0"
        xmlns:shp="http://pineapple.dev.java.net/ns/plugin/ssh_1_0" >
    <mmd:variables>
      <mmd:variable key="tmp-dir" value="/tmp" />
      <mmd:variable key="docker-source-config" value="docker.config" />
      <mmd:variable key="docker-target-config" value="/etc/sysconfig/docker" />
      <mmd:variable key="create-user-script" value="create-docker-user.sh" />
    </mmd:variables>

      <mmd:model target-resource="ssh-ci-node" target-operation="deploy-configuration" description="Create and add Docker user to sudoers" >
        <mmd:content>
        <shp:ssh>
          <shp:copy-to source="modulepath:bin/${create-user-script}" destination="/tmp/${create-user-script}" chmod="775 "/>
          <shp:execute command="sudo /tmp/${create-user-script}" />
        </shp:ssh>
      </mmd:content>
    </mmd:model>

    <mmd:model target-resource="ssh-ci-node" target-operation="deploy-configuration" description="Install EPEL repository" >
      <mmd:content>
        <shp:ssh>
        <shp:execute command="sudo wget http://dl.fedoraproject.org/pub/epel/6/x86_64/epel-release-6-8.noarch.rpm" />
        <shp:execute command="sudo rpm -ivh epel-release-6-8.noarch.rpm" />
        </shp:ssh>
      </mmd:content>
    </mmd:model>

    <mmd:model target-resource="ssh-ci-node" target-operation="deploy-configuration" description="Update the lib-device-mapper" >
      <mmd:content>
        <shp:ssh>
        <shp:execute command="sudo yum-config-manager --enable public_ol6_latest" />
        <shp:execute command="sudo yum --assumeyes install device-mapper-event-libs" />
        </shp:ssh>
      </mmd:content>
    </mmd:model>

    <mmd:model target-resource="ssh-ci-node" target-operation="deploy-configuration" description="Install Docker" >
      <mmd:content>
        <shp:ssh>
          <shp:execute command="sudo yum --enablerepo=epel-testing --assumeyes install docker-io" />
          <shp:execute command="sudo yum -y update docker-io" />
          <shp:copy-to source="modulepath:bin/${docker-source-config}" destination="${tmp-dir}/${docker-source-config}" chmod="775" />
          <shp:execute command="sudo mv ${tmp-dir}/${docker-source-config} ${docker-target-config}" />
          <shp:execute command="sudo service docker start" />
        </shp:ssh>
      </mmd:content>
    </mmd:model>
</mmd:models>
The configuration details
Two schema are used in the model file. The http://pineapple.dev.java.net/ns/module_model_1_0 is used to define the namespace mmd which defines the general infrastructure for models. The http://pineapple.dev.java.net/ns/plugin/ssh_1_0 schema is used to define the namespace shp which is used to define the model for the SSH plugin. Since multiple schemas are used to define the model file, the elements are qualified.
Initially in the model a set of variables are defined within the variables stanza. The variables are referenced from the remaining part of the model file.
The target-resource attribute defines a reference to the resource which is targeted when the model executed. In this case, the value ssh-node1 targets the model to a single resource. The two other nodes in the linux-vagrant environment isn't used in this example.
The model file is divided into two sub-models, which performs the tasks:
- Create Docker user. A custom docker user is created and added to the sudoers file.
- Install EPEL repository. Docker is available for RHEL (and CentOS) from the Extra Packages for Enterprise Linux (EPEL). The EPEL package is installed which containts the EPEL PGP key and the YUM configuration.
- Update the lib-device-mapper. Docker version 1.4.0+ requires update of the device-mapper libs to be updated to >= 1.02.90-1 on Centos/RHEL 6.5.
- Install Docker. Docker is installed and updated. To install the latest version of Docker, the package is installed from the EPEL testing repository. YUM is used to install Docker as an OS service. The Docker configuration file is installed in /etc/sysconfig/docker. Docker is started as an OS service.
The target-operation attribute is used to restrict that the sub-models are only executed when Pineapple is invoked with the deploy-configuration operation. This allows for the definition of a set of sub-models which only responds to the undeploy-configuration which implements the inverse semantics, e.g. uninstallation of Jenkins from the target server.
Finally, the execute commands in the models is executed using sudo. The requirement for sudo depends on the privileges of the user used by the SSH plugin to connect to a given host. The users was defined in credentials file in the previous section.